PlantUML Diagrams
Introduction
Having previously used PGF/TikZ almost exclusively for creating diagrams, I was recently introduced to PlantUML. I was quickly impressed by it, and while it’s a very different tool than PGF/TikZ, it works very well for quickly creating the certain types of diagrams that it supports. The PlantUML language is succinct, easy to understand and read, and the expression of diagrams focuses very much on the substance of the diagram, while laying out and styling it quite nicely. While this lack of full control over the output may be limiting in certain cases, overall I’ve found it to be highly productive when wanting to generate clear diagrams easily, while focusing on the important aspects.
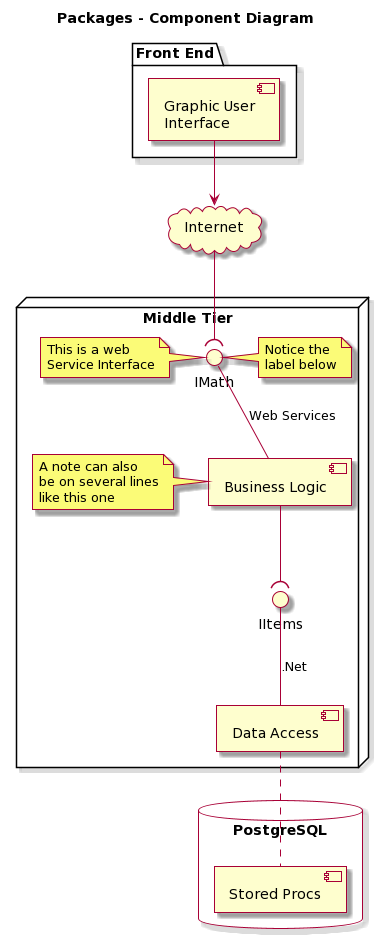
To see it in action, planttext.com has a great list of sample code that renders the diagram in the browser. It’s a very convenient way to see the various diagram types, get a sense for how it works, and even prototype small diagrams. Here is an example component diagram:

This diagram was produced by the following code. I was able to adapt such examples and be productive with PlantUML nearly immediately.
Sidenote: Highlight.js, which is used to provide syntax highlighting on this site, does not support PlantUML. As such, there is no syntax highlighting until it becomes supported, perhaps when I have time to write such support myself.
|
|
Installation
The following sections outline the basic installation steps for MacOS, but they should be easily adapted for other environments.
The result of java --version at the time of writing is shown below.
openjdk 20.0.2 2023-07-18
OpenJDK Runtime Environment Homebrew (build 20.0.2)
OpenJDK 64-Bit Server VM Homebrew (build 20.0.2, mixed mode, sharing)
PlantUML
First install PlantUML.
Go to plantuml.com/download and download the compiled JAR released under whichever license you choose.
The filename will be something like plantuml-1.2023.12.jar.
Place that file wherever appropriate on your local environment; on Mac /Library/Java/Extensions seems to be an appropriate place.
While there are certainly other places to keep JAR files, and aliasing and likely other better ways of managing them that I’ve not looked into, this full path will be used in the samples below.
GraphViz
Next, install Graphviz.
brew install graphviz
PDF Support
Installation of the two items above (PlantUML and GraphViz) are all that is necessary to start generating diagrams as PNG from PlantUML source.
To generate diagrams as PDF, some additional dependencies are required, and are listed at plantuml.com/pdf along with links to download them.
These files must be placed in the same directory as plantuml*.jar.
avalon-framework-4.2.0.jarbatik-all-1.7.jarcommons-io-1.3.1.jarcommons-logging-1.0.4.jarfop.jarxml-apis-ext-1.3.04.jarxmlgraphics-commons-1.4.jar
Math Support
For math support, see plantuml.com/ascii-math for instructions to install JLaTeXMath, a Java library for displaying mathematical formulas written in LaTeX.
Follow the link at the bottom of the page to download the following dependencies and place them in the same directory as plantuml*.jar.
batik-all-1.7.jarjlatexmath-minimal-1.0.3.jarjlm_cyrillic.jarjlm_greek.jar
The Basics: Generating a PlantUML Diagram
Having followed the four installation steps above, PlantUML can now be used to generate a diagram from source.
Generate Diagram as PNG
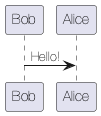
Take the following sample from planttext.com and paste it into a file called sample.puml.
|
|
The minimum command to generate an image from the PlantUML source is below. The default output is PNG.
# Generate sample.png from sample.puml
java -jar /Library/Java/Extensions/plantuml-1.2023.12.jar sample.puml
The resulting file, sample.png is shown below.

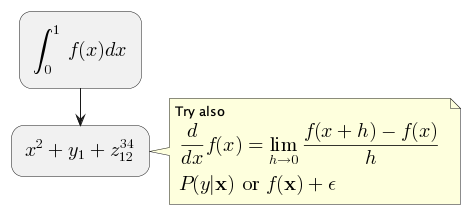
PlantUML supports math like the example below from plantuml.com/ascii-math.
|
|
With math support installed as described above, and the sample PlantUML pasted into a file called sample-math.puml, the same basic command below can be used to generate the diagram.
# Generate sample-math.png from sample-math.puml
java -jar /Library/Java/Extensions/plantuml-1.2023.12.jar sample-math.puml
The resulting file, sample-math.png is shown below.

Generate Diagram as PDF
To generate diagrams as PDF, after installing the above dependencies, simply use the -tpdf option (instead of nothing which is the same as -tpng).
# Generate diagram as PDF
java -jar /Library/Java/Extensions/plantuml-1.2023.12.jar -tpdf sample.puml
Displaying Help
A list of all the command line options can be displayed with
# Display help
java -jar /Library/Java/Extensions/plantuml-1.2023.12.jar -help
Font Support
To change fonts in a PlantUML diagram, it’s helpful to first print the list of fonts that PlantUML knows, and verify the names it knows them by.
This can be accomplished by using listfonts in a PlantUML diagram and generating an output to a file.
Rather than creating a document with this one command, we can pass the contents of such a document to the PlantUML command.
A couple such options are shown below, first for zsh.
(Strangely, this seems to break when attempting to write to PDF with -tpdf, but given it doesn’t really matter I did not investigate further.)
# Write list of available fonts to fonts.png (zsh option 1)
java -jar /Library/Java/Extensions/plantuml-1.2023.12.jar -o $PWD -tpng =(echo "@startuml fonts\nlistfonts\n@enduml")

# Write list of available fonts to fonts.png (zsh option 2)
echo "@startuml\nlistfonts\n@enduml" | java -jar /Library/Java/Extensions/plantuml-1.2023.12.jar -o $PWD -tpng -pipe > fonts.png
These methods show some different capabilities of PlantUML – in the first option the filename is specified by fonts which follows @startuml, and the output directory is specified by -o.
The second method shows the use of PlantUML’s -pipe option.
Using bash it can be done with the following commands, either using printf instead or echo -e to expand the newline.
# Write list of available fonts to fonts.png (bash option 1)
printf "@startuml\nlistfonts\n@enduml" | java -jar /Library/Java/Extensions/plantuml-1.2023.12.jar -o $PWD -tpng -pipe > fonts.png

# Write list of available fonts to fonts.png (bash option 2)
echo -e "@startuml\nlistfonts\n@enduml" | java -jar /Library/Java/Extensions/plantuml-1.2023.12.jar -o $PWD -tpng -pipe > fonts.png
The fonts.png image lists the fonts.
Note the image below has been cropped to only show the first two dozen or so fonts.

With the list of fonts now known, the desired font can be specified by skinparam defaultFontName HelveticaNeue in a PlantUML file called sample-helveticaneue.puml as shown below.
|
|
This file is passed to the PlantUML command as before.
# Generate diagram as PNG
java -jar /Library/Java/Extensions/plantuml-1.2023.12.jar -tpng sample-helveticaneue.puml
Now, the generated diagram uses HelveticaNeue:

There are many other ways to style a diagram that are not covered here.
However, it is worth noting that passing -language to PlantUML will display, among other things, the various skinparams that can be used.
# Display available types, keywords, skinparams, etc.
java -jar /Library/Java/Extensions/plantuml-1.2023.12.jar -language
Building in Docker
If the instructions described in Installation are too much trouble, or you would for any other reason like to run PlantUML from a container, plantuml.com/command-line has some instructions. There links to an image can be found on Github Packages and Docker Hub. You can pull one of these images and use the PlantUML installation within to generate your diagrams.
# Pull the image from Docker Hub
docker pull plantuml/plantuml
For example, the sample.puml diagram above can be built using this container with the following command.
# Generate sample.png from sample.puml using the plantuml/plantuml image
docker run --rm -v $PWD:/puml-diagrams plantuml/plantuml -o /puml-diagrams/out /puml-diagrams/src/sample/sample.puml
However, from the Dockerfile for this image, the additional dependencies to generate PDFs or render LaTeX math are not installed. A modified image is needed that contains all the dependencies.
Option 1: Modify Container and Save a New Image
One option is to simply copy the necessary dependencies into a container running the plantuml/plantuml image, save that as a new image, and then run this new image.
# Run a new container from the plantuml/plantuml image
docker run --name puml_container plantuml/plantuml

# Copy all the .jar files into puml_container to the /opt directory (where PlantUML is installed)
docker cp jars/. puml_container:/opt

# Save the container as new image
docker commit puml_container dpwiese/plantuml

# Run the newly created dpwiese/plantuml image as a new container
docker run --rm -v $PWD:/puml-diagrams dpwiese/plantuml -o /puml-diagrams/out /puml-diagrams/src/sample/sample-math.puml
This was easy enough to do, might become a bit tedious if more configuration was required to a running container. Another option is to perform this configuration with a Dockerfile and create the new image from that.
Option 2: Building Our Own Docker Image from Dockerfile
We can leverage a Dockerfile from an existing OpenJDK Distribution such as Amazon Corretto (Dockerfile) and specify here the installation of dependencies.
In this case, that is apt install -y graphviz and COPY ./jars /user/share/java.
With those lines added the following commands can be walked through to generate the new image.
# Build the new image from the Dockerfile
docker build -t buster-slim-plantuml:1-2023.12 -f Dockerfile .

# Run a container from this newly created image
docker run --rm -v $PWD:/puml-diagrams buster-slim-plantuml:1-2023.12 java -jar /usr/share/java/plantuml-1.2023.12.jar -o /puml-diagrams/out /puml-diagrams/src/sample/sample-math.puml
One noticeable difference in the way this second image was created is that it doesn’t use the PlantUML entry point defined in the first image.
That entrypoint could have been overridden, but it just makes calls to run PlantUML more verbose.
Without this entrypoint though, it makes it easier to pass arguments to java, should they be needed.
This image can be further modified as needed and uploaded to a repository where it may be more easily accessible. As of the time of writing I have not done, and won’t describe that process here.
Using a Makefile
The above steps and commands, while not terribly difficult to run, are a bit cumbersome to remember and modify each time a new diagram is created.
To further simplify this process, it made sense to create a makefile, and adopt a project structure like the one I use at dpwiese/checklists to create aviation checklists.
With basic knowledge of Make, and the commands above, the makefile can be easily assembled.
There isn’t too much to describe here, and the makefile can be found in the sample project repository at dpwiese/puml-diagrams-sample.
The objective achieved via the use of this makefile was to map the above commands to things like make fonts, make png, make pdf, and so on.
A Few Additional Comments
- If you are using Sublime Text as your editor, consider using jvantuyl/sublime_diagram_plugin for syntax highlighting.
- The PlantUML FAQ indicates the default image dimensions are capped to 4096.
To override this limit the
PLANTUML_LIMIT_SIZEenvironment variable can be set. One option to do this is via the command line argument tojava, for example-DPLANTUML_LIMIT_SIZE=8192. - The steps above should enable basic usage of PlantUML but there are still warnings and issues with font support in PDFs that I have not yet resolved.
Some of these are silenced in the makefile with the
-quietoption and&>/dev/nullredirection.
java[44639:1952503] WARNING: Secure coding is not enabled for restorable state! Enable secure coding by implementing NSApplicationDelegate.applicationSupportsSecureRestorableState: and returning YES.

java[44639:1952508] CoreText note: Client requested name ".HelveticaNeueDeskInterface-Regular", it will get TimesNewRomanPSMT rather than the intended font. All system UI font access should be through proper APIs such as CTFontCreateUIFontForLanguage() or +[NSFont systemFontOfSize:].
- If any issues are encountered with JIT, it can be disabled by passing
-Djava.compiler=NONEtojava. I’ve tended to use this by default to prevent such issues, and have not noticed a meaningful performance hit. - Other than the single
skinparamused above to change the font, no comments on writing or styling PlantUML diagrams were given above. It is relatively straightforward, and perhaps something I will write up in the future. - Lastly, given the use of Docker for generating diagrams, it is also relatively straightforward to trigger the generation and storage of diagrams as artifacts as part of a CI build process. This would allow the generated images to stay always in sync with the underlying source code, and more readily accessible to those who may not wish to generate them themselves.